
new old look
Having previously stripped the vintage fly rod of its guides and removed the coats of varnish and black paint, it was time to press ahead and give the blank its new look. Having not had much experience with spray paint, I was a bit nervous about this stage. I knew I had to build up the finish using multiple thin layers of paint, turning the blank as it was drying to avoid any chance of runs forming, but that was about it. A few days later the paint order arrived and it was time to give it a go! I decided that the sensible place to do this was just inside the doorway of the garage; as a result, the items in storage were covered with an old bedding sheet to avoid adding any unintentional ‘special’ paint effects onto them. As an additional precaution I thought it best to direct the spray downwards onto a sheet of some sort. The previous evening prior to my great spray paint adventure taking place, a storm was in full force outside and in the morning, I found it had rather fortuitously deposited a piece of heavy black plastic sheeting that was ideal for the purpose!
Prior to spraying the rod, a couple of test sprays revealed that the colour (a rich red/dark-brown called ‘Mr Reser’) was very close indeed to the original colour of the rod which had been revealed by sanding. It was time to take a deep breath and begin spraying the blank. With the first layer on both sections of the blank I went inside and made a cup of coffee, returning to the garage 10 minutes later to turn the blank. The next visit after another 10 minutes revealed the paint had dried. The next thin layer of paint was applied and the process was repeated several times until I was happy with the coverage. The result of this process was an even, uniform layer of colour over the blank which I was pleasantly surprised and relieved about; which just goes to show, if I can do it there is hope for anyone. One last look over the sections to check the paint coverage was even and I was done (or so I thought!).


Nice and warm indoors, the components for the blank still had to be ordered. After reviewing the original guides, I decided to replace them as they had seen better days, and were likely beyond saving anyway. I opted for English Pattern DLC snake guides and a Seymo DLC tip ring which all have a nice black finish. The stripper guide was a Fuji 3 leg guide, and all the guides offered a nice balance between quality and cost I felt. After an email enquiry and a very helpful reply from Guides N Blanks, I opted to order a couple of extra snake guides at the same time, along with some heat glue, a spool of Chestnut Brown whipping thread and some matt varnish (two bottles, just to be sure!). A few days later and with the order gratefully received, I was keen to press ahead. Later that weekend one final check before starting to varnish the blank revealed a tiny uneven area of spray paint; how did I miss that? Not to worry: back to the garage one last time!


Paint dry, it was time to try out my varnishing and guide whipping jig, which consisted of recycled packing material and two strips of black foam. It also doubled as a varnish drying platform which I could use for both sections of the rod simultaneously.

The finish of the rod was to be a matt finish in keeping with the overall vintage look of the rod and like the spray paint, I wanted multiple thin layers to be applied (and no runs thanks you very much!). I found it easiest to do this with a soft watercolour brush.
The following day once the varnish layers were completely dry, the next task was to begin attaching the guides. But before I could do this, I would need to find the ‘spine’ of the tip section (or so my research said). There are video clips to show how to do this, but basically you place the ferrule onto a hard surface, supported by one hand while also supporting the very tip with your other palm. The tip section is then rolled to find where it naturally bends the easiest; this point is the spine. Wonderful; I had found and marked the spine but what to do with it! An article regarding the spine and placement of guides I read explained that one theory is you place the guides on the side where it curves easiest (on the underside of the spine) which should to some degree, aid the lifting of the line off the water and into the backcast. It explained another idea was having the guides on top of the spine (on top of the curve) and that would assist the forward cast. Another spine theory (perhaps a less common one) suggested you could have the guides at 90 degrees to the spine (on one side of the curve) to negate the effects of the spine. If that wasn’t enough, it said there was another theory which said to simply ignore the concept of spine all together; the idea being that it made such a minuscule difference to the rods performance that it wasn’t worth bothering about! In the end I opted to whip the guides to the underside of the spine, although how much difference this will actually make in practice, I’m not sure. Perhaps the last theory was the most accurate one.
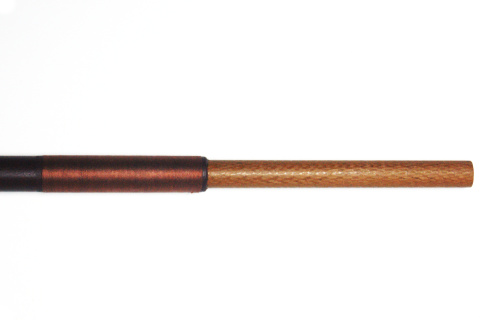
Starting with the handle section, the keeper ring and stripper guide were whipped into position after taking a line from the centre of the reel seat as a guide (no pun intended). Attaching the tip ring was a fairly simple affair; I just had to melt the end of the glue stick (I used a candle) and smooth the end of the glue stick over the exposed tip section and then push on the tip ring, aligning it with the spine line marked on a piece of masking tape on the blank. From there it was a case of methodically and carefully whipping the guides into place, working down the tip section from the tip ring towards the ferrule, while ensuring each guide in turn was correctly aligned. By closing one eye and looking down the blank through the guide, rather like when sighting a rifle, you can see if the guide is off centre. With one leg whipped in place, a gentle adjustment can be made with thumb and forefinger if the alignment isn’t quite correct. Guides attached, all that was left to do was wrap the ferrules and just below the tip ring. Once varnished several times with thinned varnish (being water based no thinner was needed, just some drops of water), the copper-bronze thread darkened slightly which really helped the vintage look. I didn’t want to go down the route of adding trim bands (thin decorative whippings of normally a contrasting colour) as I liked the simple, minimal aesthetic the warm brown colour of the blank and chestnut thread wraps had created.


Now all I had to do was order a rod bag.

Looks great. Nice work. Understated and functional.
LikeLike
Thank you for your kind words. A subtle minimal look is what I was after. Quite a change from when I first brought it home on the train, with its black gloss finish and black thread whippings.
LikeLike