old rod, new rod
After a terrible Christmas and New Year, due to a flu-like virus, it was time to cheer myself up and begin my little winter project; restoring a long forgotten, vintage fly rod. During a visit to my parents’ at the end of last summer, my mum happened to mention that she was clearing out a cupboard and had come across some childhood fishing rods of mine. Intrigued, I had to have a look!
The collection included a Daiwa salmon spinning rod (used at the time for estuary flounder fishing and lure fishing from the rocks), an old Woolworth’s beach rod which was a present from grandfather at the time and an unbranded (Winfield from Woolworths?) trout fly rod. Holding the all the rods in turn, brought back many happy boyhood fishing memories, along with thoughts of seemingly simpler and easier times.
Looking at the vintage fly rod, and facing the end of the trout fly fishing season, I decided it would be a fun project to restore the vintage fly rod, and have a cast with it when the new season opened. It was going to be interesting to see how a forty years old rod would compare with my more up to date ones! Given the rods lack of value in monetary terms at least, if it all went disastrously wrong due my lack of rod building experience, then I wouldn’t really have lost anything; after all it had been sitting at the back of a cupboard for the last twenty years! I realised that my last rod build would likely have been that fly rod.
Right; first things first, I needed a plan of action:
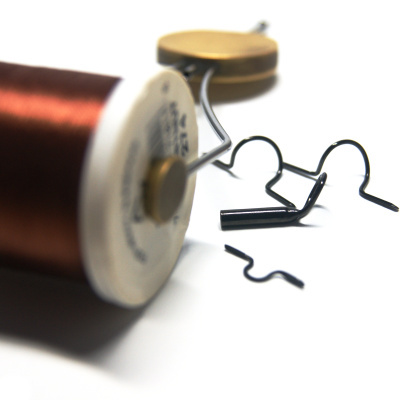
Stage 1 – remove the guides, the varnish and the paint layers
Stage 2 – clean the cork handle and remove the run of varnish from it
Stage 3 – paint the blank if necessary (if the original brown layer couldn’t be saved)
Stage 4 – matt varnish the blank
Stage 5 – whip and varnish the guides onto the blank (using the original guides if possible)
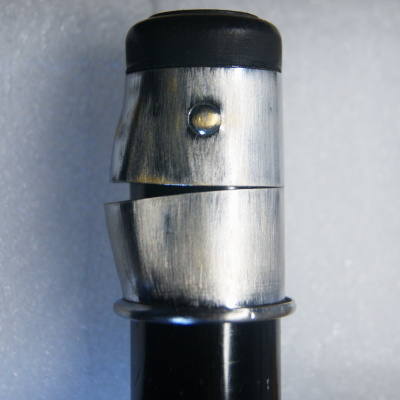
Originally it was a rich chocolate brown colour (wasn’t everything in the late 70’s and early 80’s?). However, as a youthful folly, I had painted it black and given it a coat or two of gloss rod varnish; that would have to go! I had thought it may be nice to keep the original guides so, I noted their spacing after testing the rod under stress, to make sure the line was following the curve of the blank which it did fairly adequately (but perhaps I could better?). The overall plan was to remove the guides, strip the varnish layer off, strip the black paint off and return it to its original colour giving it a quiet and subtle vintage look. I decided to keep the existing handle as an original feature as it held the reel securely enough, however, if I could dull the shiny chrome reel fittings that would be good.
Having removed the guides, I began Stage 1; sanding back the varnish and paint layers, being careful to avoid sanding down too far and exposing the wall of the blank. At this point I wondered if it would be possible to remove the black paint and have the original chocolate coloured blank exposed, but that was impossible as it would turn out; in some areas the brown paint seemed very thin, and it was easily removed by even gentle sanding with fine sandpaper, exposing the original primer beneath. I was going to have to repaint the stripped blank too, which didn’t come as too much of a surprise really.


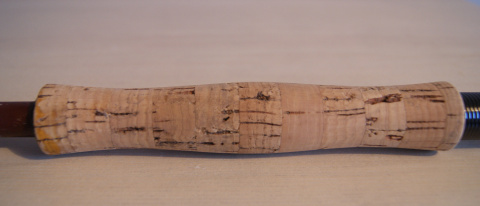
It was at this point that I turned my attention to my varnish attempt of youth, of which some varnish had found its way onto the handle. I found if I pressed it with my thumbnail so that it loosened, I could simply peel it off, exposing the cleaner cork beneath. A quick, light scrub with some warm soapy water and an old toothbrush brought up the cork nicely and by the end I couldn’t see where the varnish run had been removed from, so I was quite happy and grateful for this first, small victory.
Deciding to try and dull down the chrome I used some fine sandpaper and very gently set to work. The result was interesting and seemed to age the chrome, which actually I quite liked!

So far so good. With the blank sanded as much as I dared, it was time to think about paint. In the end I opted for an acrylic spray paint which was suitable for a variety of surfaces, but most importantly, would flex, so as to be less likely to crack under the rod finish. Next consideration was the colour. It would need to be in keeping with the vintage theme and after a bit of research, I found what I was looking for; an acrylic spray paint in a ‘chocolate’ brown colour. The name of the colour was ‘Mr Reser’ by Cobra. Order placed, I would need to wait a day or two before the next stage; painting the blank…

It’s reminiscent of an old rod I’ve had for 48 years. The cork handle and reel seat look identical. After a new tip, a crushed butt section and now missing the top 3″, it’s time to rethink it’s future
LikeLike
Hi George and thank you for your comments. It sounds like your vintage fly rod has lived a full life!
That is interesting what you say about the handle and reel seat looking identical (I will update the post with an image of the handle in its original state for comparison for you.). I did try numerous image searches (and eBay searches) to try and identify my own vintage rod and found that a few vintage rods had similar cork handles and reel seats, mainly Shakespeare, ABU and DAM rods from what I could find. I did search specifically for ‘Winfield fly rods’ or ‘vintage Woolworths fly rods’ (etc) but not much resulted in the way of fly tackle; a few fly reels and coarse and sea tackle, but no fly fly rods. Regardless, it was a happy trip down memory lane!
LikeLike
I gather it wad custom made being of no particular brand on a Hardy or Fischer blank. The hardware is probably as you mention. It has been replaced by a Primal Twig 6’6″ fibreglass 3 weight.
LikeLike